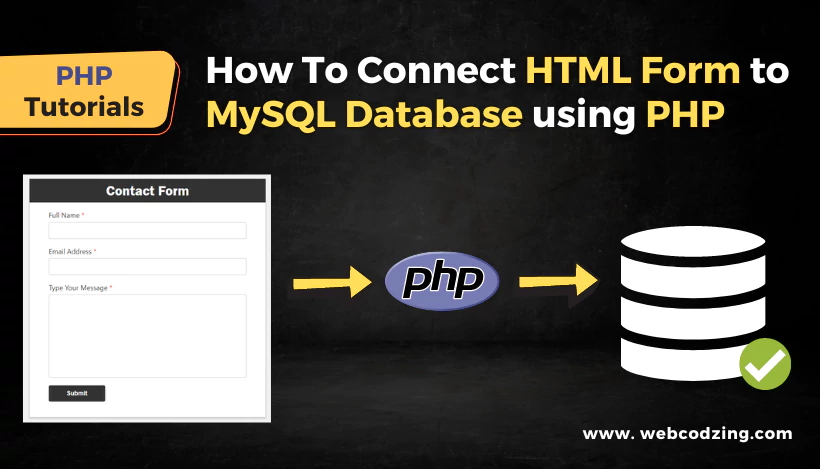
How to Connect HTML Form to MySQL Database using PHP
Creating the HTML form is very easy. But connecting that HTML form to the MySQL database using PHP can be a little bit complicated for beginners. But this is not rocket science, trust me you can do it very easily. This tutorial will teach you, how to connect HTML Form to MySQL database with the help of PHP.
After reading this guide, you will be able to:
- Save HTML form entries in the database.
- Create MySQL database
- Create tables in MySQL Database
- Connect HTML to MySQL database using PHP
- Create a PHP file to get entries
So, let’s get started.
First and foremost, the most important question that arises here is. What do we need? We need just two things a text editor and XAMPP server software.
So what are we going to do? Let’s see the steps that we are going to perform in this article. You can jump to any of these below steps by clicking:
- Firstly, we’ll install and run XAMPP on your PC or laptop.
- Then next, create MySQL database to Connect to HTML Form.
- Create a table in MySQL database to Save HTML Form Entries.
- Create HTML Form.
- After that, we’ll Create a PHP file to get HTML form entries.
- Lastly, we will create a Connection to Save HTML Form Data in MySQL Database.
How to Connect HTML Form to MySQL Database using PHP
Let’s begin with our first step.
1. Install and Run XAMPP on Your PC to Create MySQL Database for HTML Form
You can download XAMPP from the apachefriends.org website. It is open-source webserver software and is freely available. XAMPP allows us to create a server environment on our local computer.
We need XAMPP because PHP and SQL are server-side languages, so we need a server. Also, to save HTML form entries in the database we need a MySQL database. XAMPP allows us to create a MySQL database and run PHP.
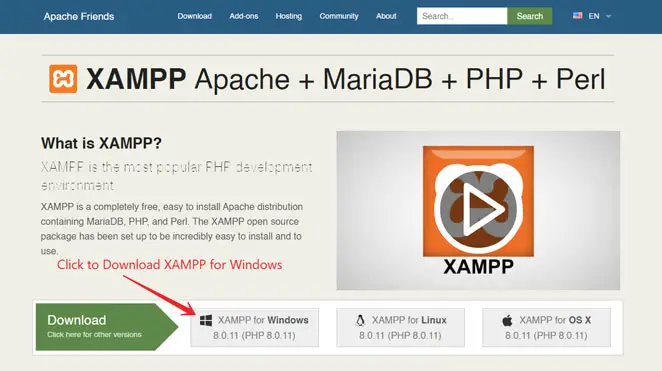
There are other software like WAMP and MAMP etc available to create a web server. But I selected XAMPP because it is available in multiple operating systems like Windows, Mac OS, and Linux.
Tip: If you want to know more about XAMPP then check this guide on WordPress installation on localhost using XAMPP. In this guide, you will also learn more about what is XAMPP. And how to download and install XAMPP? And if you are a WordPress user then this guide will really help you.
Now let’s go to the main topic.
After downloading XAMPP, go ahead and install and run XAMPP on your PC or laptop. When you will open XAMPP, just run Apache and MySQL servers as shown in the image below.
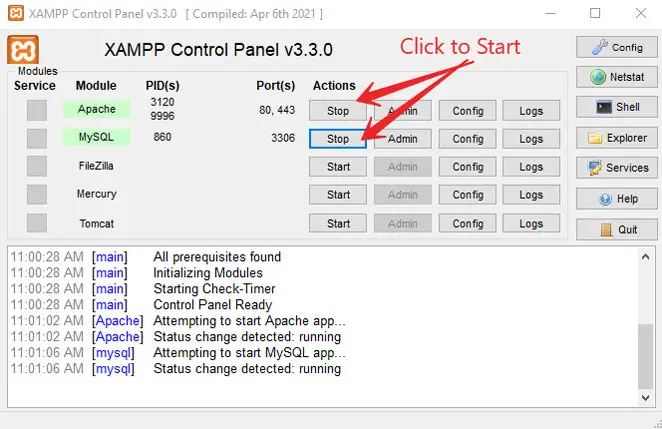
Now you have created a local web server on your computer. It will allow you to run and execute PHP and SQL code. Now we can create a MySQL database. To connect HTML form to MySQL database using PHP, we need a database.
Minimize XAMPP. Don’t close it.
Let’s see the second step.
2. Create MySQL Database to Connect to HTML Form
To do this, open your browser. And type localhost/PHPMyAdmin in your browser’s search bar and press enter. As shown in the image below.

This will take you to the PHPMyAdmin page. Where we will create a MySQL database to save HTML form entries.
A quick introduction to PHPMyAdmin: It is a free and most popular administration tool for MySQL databases. The benefit of using PHPMyAdmin is that we can create and manage databases without having any knowledge of SQL language.
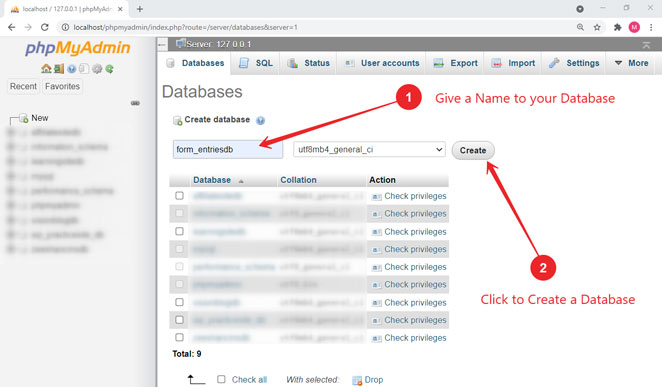
Now see the next image below. In this image, on the left side, all databases are listed. Just click on the New button to add a new database.

On the next page, you will choose the name of your database. After that click on Create button. You can give any name to your database. I will give it a form_entriesdb name. You can use the ‘_’ underscore sign in your name. As shown in the image below.
Now the database has been created successfully. On the next page, you will create a table in your database. Don’t close the page. Let’s see the third step of this lesson.
3. Create a Table in MySQL Database to Save HTML Form Entries
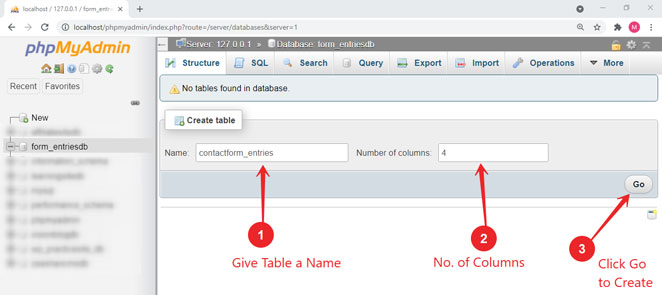
After creating a MySQL database for the HTML form, you will be redirected to the tables page as shown in the image below. This is where you will create a table and provide number of columns for your form in which the user input data will store.
To do this, first give a table name. I’ll give a name to this table something like (contactform_entries). Remember this table name, because we’ll use it in our PHP code later.
Then, enter the number of columns for the table. I will enter 4.
Here remember, in these columns, every HTML form input that the user will enter will save after processing through PHP code.
I will create three input fields in my HTML form Name, Email, and Message. Then there will be four columns in the database table like Id, Name, Email, and Message.
Because I have three input fields in my HTML form. I entered 4 here. Because id will auto-increment and tell us how many entries have been saved. It is for our convenience only.
When we export a database table in an Excel file. The id does not show by default if we do not create a column with the name id.
After entering the table name and number of columns, click the Go button to create a table.
Now see the next image below. Here we will enter our column details.

Every column should have a name, data type, length of characters, and so on. So we can store the data according to our column in the database.
Fill in all the details I have given below.
| Name | Type | Length/Values | Default | Null Index |
|---|---|---|---|---|
| id | INT | 20 | None | Primary |
| name_fld | VARCHAR | 20 | None | |
| email_fld | VARCHAR | 20 | None | |
| msg_fld | TEXT | 1000 | None |
See it will look like this in the image below. Remain the other fields as it is. Only fill in the details for Name, Type, Length, and Null Index for only id.
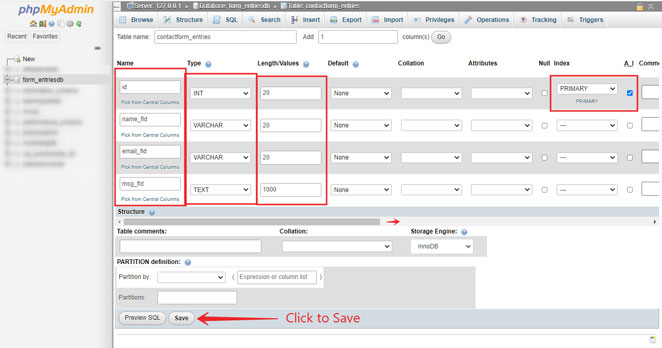
Then click the Save button located at the bottom to save.
Only one thing remains then we will go to our HTML form.
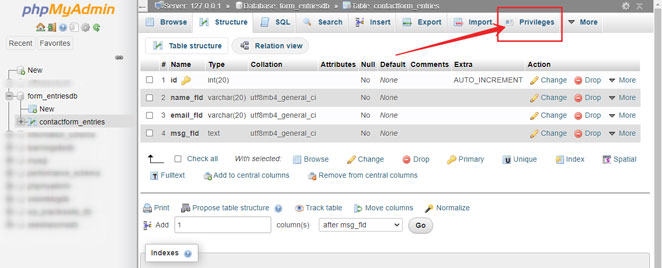
Create a User of this MySQL Database and Assign Privileges
Every MySQL database must have at least one user who can access, edit, save, and retrieve data from that database.
To create a user, go to the Privileges tab as shown in the image below.
Note: Just make sure your database is selected otherwise you’ll not see the ‘Privileges’ option.
In the Privileges tab, we will create a user for this database. And these details will be needed during the connection of the database using PHP.
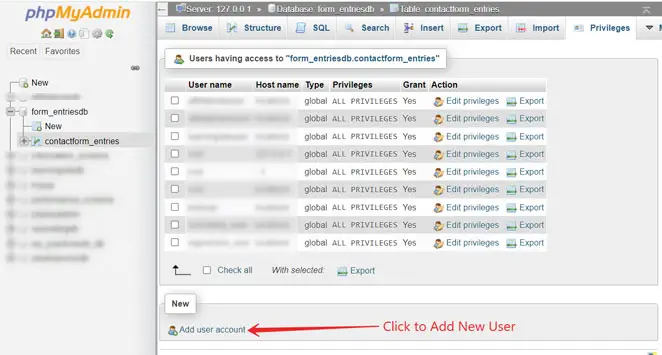
After clicking on Add user account, provide these details.
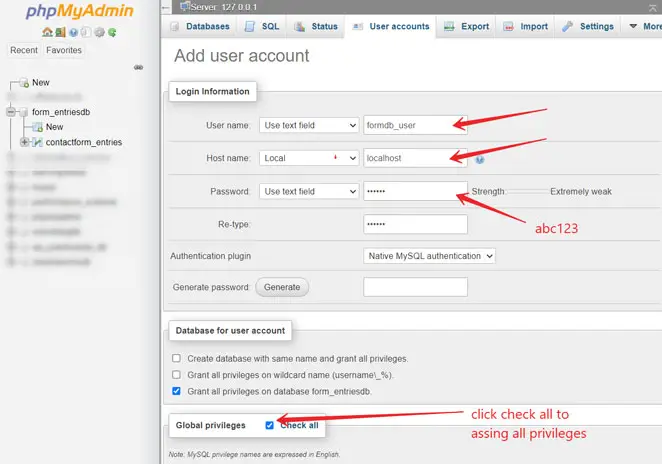
Remember these details: I created a user name with the name formdb_user, then in the dropdown, I selected localhost, and then the password abc123.
Now, click the check to assign all privileges to this user. And then scroll down to the end of the page. And click the Go button to save.

Now the database part is done.
Before going to the fourth step. We have to create a folder with the name testsite in htdocs folder located inside the XAMPP folder. In that folder, we will place our code files.
Create a Folder in htdocs and Name it ‘testsite’
To do this, open the XAMPP folder where you installed it. In the XAMPP folder, find a folder named docs. This is the folder where we place our website files on the local server.
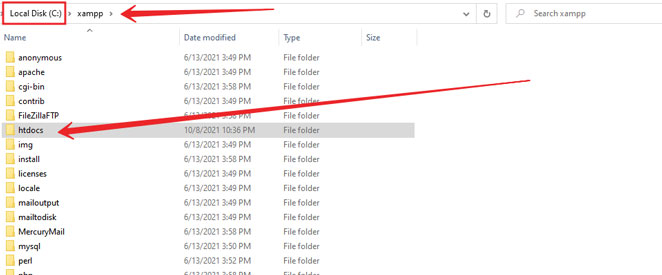
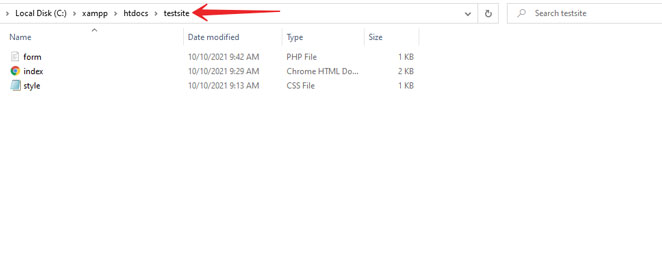
Open it and create a folder and name it testsite. In this folder, we’ll place our HTML form, CSS stylesheet, and PHP file. So that we can access them on our PC.
Let’s see the fourth step. I will not create the whole HTML form, just will give you some code to copy-paste and information. So, don’t be a bore.
4. Create HTML Form
Open your text editor. I am using the visual studio code editor. Whatever text editor you have, just open that text editor and create a new HTML file and name it contact.html. So that you can paste the HTML form code given below.
If you do not want to copy the below HTML form code and want to build your own contact form from scratch. Then you can check out this complete tutorial to create a contact form in HTML.
Before going to see the HTML form code check the image below. The form that you’ll create will look like this.
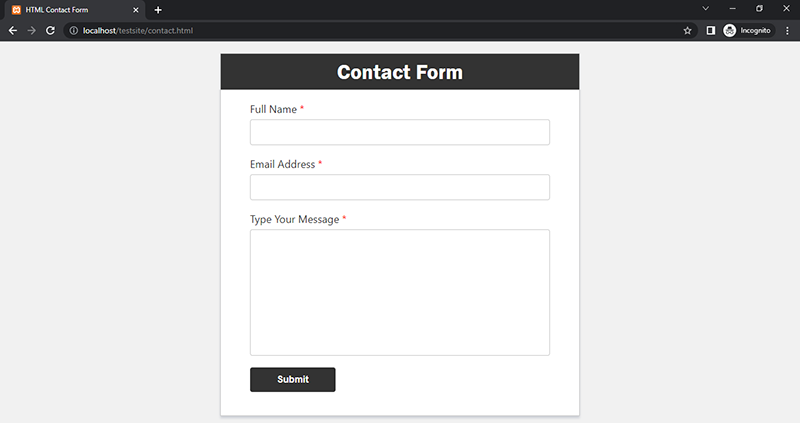
We’ll connect this HTML form with the MySQL database using PHP. So that we can receive the contact form entries and save them to our database.
Now copy the HTML form code given below and paste it into your HTML file.
→ contact.html
<!DOCTYPE html>
<html lang="en-US">
<head>
<meta charset="UTF-8">
<meta http-equiv="X-UA-Compatible" content="IE=edge">
<meta name="viewport" content="width=device-width, initial-scale=1.0">
<title>HTML Contact Form</title>
<link rel="stylesheet" href="styles.css">
</head>
<body>
<div class="form-container">
<!-- HTML Form Code -->
<form method="POST" action="form.php">
<!-- Form Title -->
<div class="form-title">
<h1>Contact Form</h1>
</div>
<!-- Form Inputs -->
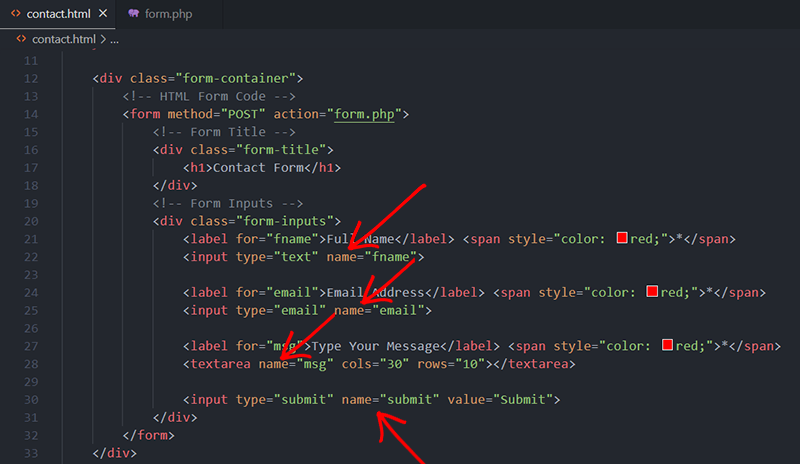
<div class="form-inputs">
<label for="fname">Full Name</label> <span style="color: red;">*</span>
<input type="text" name="fname">
<label for="email">Email Address</label> <span style="color: red;">*</span>
<input type="email" name="email">
<label for="msg">Type Your Message</label> <span style="color: red;">*</span>
<textarea name="msg" cols="30" rows="10"></textarea>
<input type="submit" name="submit" value="Submit">
</div>
</form>
</div>
</body>
</html>
After that create a new CSS file and name it styles.css.
Copy the below CSS Code and paste it into your CSS file. This will apply the design to your HTML form.
→ styles.css
 *{
    box-sizing: border-box;
    margin: 0;
}

body{
    font-family: 'Segoe UI', Tahoma, Geneva, Verdana, sans-serif;
    font-size: 18px;
}

div.form-container{
    max-width: 1600px;
    height: 100vh;
    padding: 20px 0;
    background-color: #f1f1f1;
}

form{
    width: 45%;
    margin: auto;
    background-color: #ffffff;
    border: 1px solid #c7c7c7;
    box-shadow: 0 4px 4px rgba(87,100,126,.21);
}

div.form-title{
    padding: 10px 0;
    border-bottom: 1px solid #c5c5c5;
    background-color: #333333;
}

div.form-inputs{
    padding: 20px 50px;
}

h1{
    text-align: center;
    font-family: 'Franklin Gothic Medium', 'Arial Narrow', Arial, sans-serif;
    color: #ffffff;
}

input, textarea{
    display: block;
    margin: 6px 0 20px 0;
}

label{
    font-weight: 400;
    color: #333333;
}

input[type=text], input[type=email], textarea{
    width: 100%;
    font-size: 16px;
    padding: 12px 8px;
    color: #555555;
    border: 1px solid #c7c7c7;
    border-radius: 4px;
}

form input[type=text]:focus, input[type=email]:focus, textarea:focus{
    outline: 1px solid #c1c1c1;
}

textarea{
    resize: none;
}

form input[type=submit]{
    font-size: 16px;
    font-weight: bold;
    padding: 12px 46px;
    border: none;
    background-color: #333333;
    color: white;
    border-radius: 4px;
}
form input[type=submit]:hover{
    background-color: #0e42de;
    cursor: pointer;
}
After copying and pasting these codes, just save them. Remember, the code files should be in our testsite folder.
Now, we have a beautiful HTML form. It’s time to write some PHP code to get form entries and send them to the database.
One thing to know, you can access this form in your browser by typing localhost/testsite/contact.html in your browser. Just make sure XAMPP, Apache, and MySQL services are running. Otherwise, this will show an error.

Now, let’s see the next step in which we’ll create a PHP file so that we can connect this form to the MySQL database.
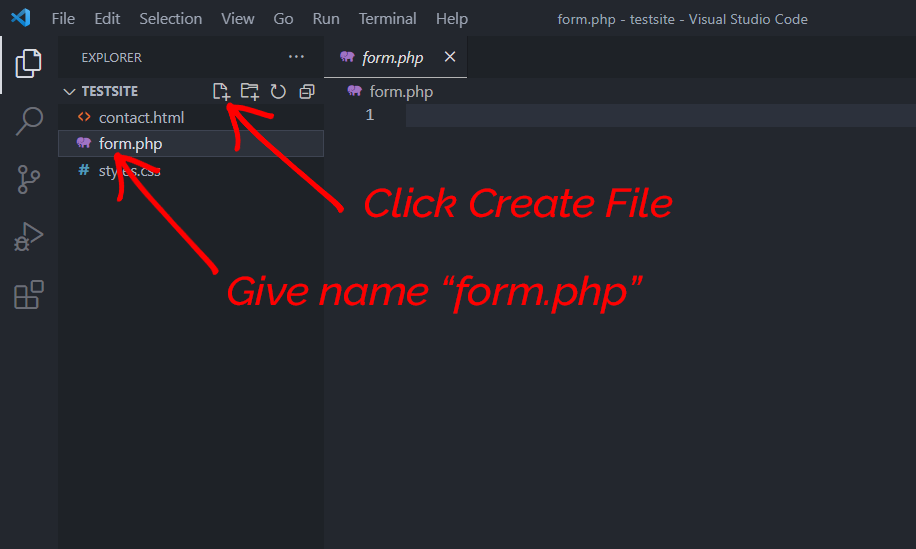
5. Create a PHP file to Get HTML Form Entries
First of all, create a new PHP file in your text editor with the name form.php. If you’re using visual studio code then see the image below.
After that, just copy-paste the PHP code given below. Then, see the code explanation. Here you should understand the code very carefully. It’s an important part of this tutorial.
→ form.php
 <?php

if(isset($_POST['submit'])){
// getting and storing inputs in varaibles
    $name = $_POST['fname'];
    $email = $_POST['email'];
    $message = $_POST['msg'];
}

?>
The code will simply get the form inputs typed by the user and save them in different variables. Let’s see how.
Code Explanation:
We have two methods in PHP $_GET or $_Post to obtain the form inputs that the user types in HTML form. In the above code, I am using $_POST method because it is more secure.
The syntax is very simple. Just type $_POST[‘Enter Name Attribute Value‘];. It’s the name attribute that we specify in every HTML form <input> tag. This attribute is used by only Back-end Web developers to get what user type in HTML forms using PHP code.
The below image is demonstrating the name attributes I specified for all <input> tags.
After getting inputs, I created different variables and stored each input in a different variable.
In the end, I wrap this in an if statement. I also used isset($_POST[‘submit’]) which is a condition to check if the form submit button is set or not. If yes, then the inputs will go to the PHP file for processing after clicking the button.
Just make sure that the action=”form.php” attribute is specified inside the <form> tag. So that the form entries can go to the form.php file after clicking on the form submit button. Otherwise, it will show an error that the PHP file does not exist on the server.
Now we have got entries through PHP. It is time to make a connection to the MySQL database. So that, we can send and save these entries in the MySQL database.
Let’s go to the last step of this tutorial and see how.
6. Create a Connection to Save HTML Form Entries in MySQL Database
To do this paste the below code into your PHP file.
→ form.php
 <?php

if(isset($_POST['submit'])){
    // getting and storing inputs in variables
    $name = $_POST['fname'];
    $email = $_POST['email'];
    $message = $_POST['msg'];

    //database details. You have created these details in the third step. Use your own.
    $host = "localhost";
    $username = "formdb_user";
    $password = "abc123";
    $dbname = "form_entriesdb";

    //create connection
    $con = mysqli_connect($host, $username, $password, $dbname);
    //check connection if it is working or not
    if (!$con)
    {
        die("Connection failed!" . mysqli_connect_error());
    }
    //This below line is a code to Send form entries to database
    $sql = "INSERT INTO contactform_entries (id, name_fld, email_fld, msg_fld) VALUES ('0', '$name', '$email', '$message')";

    //fire query to save entries and check it with if statement
    $rs = mysqli_query($con, $sql);
    if($rs)
    {
        echo "Message has been sent successfully!";
    }
    else{
        echo "Error, Message didn't send! Something's Wrong.";
    }
    //connection closed.
    mysqli_close($con);
}

?>
Note: To prevent your database from SQL injection attacks. Kindly create and use your own unique database name, username, password, and table field names. Don’t copy everything the same.
Code Explanation:
- On line number 8 of the code given above, I stored the hostname, username, password, and database name in variables. We have created these details in the third step of this guide. You can scroll up and check this.
- After that, I created a connection to the database with the mysqli_connect() function. In this function, I specify the MySQL database details stored in variables.
- Then, I check the connection through the if statement.
- After that, I create an SQL query that is located on line 22 of the above-given code. In that SQL query, I specify a table name, column details, and the values that we got from the HTML form.
- Then, I fired a query to store the mysqli_query() function to store the data in the database. Then, I checked the result with an if() statement. Mean it has been stored in the database or not. This will show a success message if saved otherwise it will show an error message on the button click.
- Lastly, I closed the connection with the mysqli_close() function. In this function, I specify the variable $con where our database details are stored.
All Done! ✅
If you didn’t understand something then please tell me in the comment section below.
Tip: If you want to create a backup of your database. Then, see this guide on How to Import and Export MySQL databases using phpMyAdmin.
Conclusion:
To save HTML form entries in the MySQL database using PHP, you will do just 6 simple steps.
#1: Install XAMPP on your system. Then, run Apache and MySQL in XAMPP. (Keep it running during the whole process otherwise, the code will not work in your browser).
#2: Create a MySQL database.
#3: Create a Table in the MySQL database where your HTML form entries will save.
#4: Create an HTML form. (The HTML form code is given above with an explanation.)
#5: Create a PHP file in your text editor.
#6: Lastly, create a Connection to save HTML form entries in the MySQL database.
That’s it. Now, you know how to connect HTML Form with MySQL database.
What’s next? In the next step, you should learn how to display these form entries from the database on the PHP webpage. We also have a great tutorial about this, check this guide on how to Fetch and display MySQL Table Data from the Database using PHP.
Also, read CSS flexible box complete with examples. I used the CSS flexbox property in HTML form. This will be a helpful guide for you. And I used table tags in this guide to set HTML form fields. For this, read how to create tables in HTML.
Hope you will like it. Tell me in the comment section below.
Don’t forget to help others by sharing this tutorial!
